Showing posts with label quilting. Show all posts

Thursday, January 24, 2013

Simple Baby Blanket [Tutorial]

Pin It
I had the opportunity to make another baby shower gift basket last week (one of my fave projects to put together),
and I couldn't resist including some super cuddly fabrics.
 
I had some fleece and cozy flannel in my stock that were going really well with the colors of the basket,
so I put together a quick and simple blanket.
And since it was so gosh darn quick and so gosh darn simple,
I couldn't resist passing the steps along to you all (see below for tutorial/measurements).
 
While I love to challenge myself, I think it's good for me to remember that more time and more effort is NOT always better, yes? Simple is good, Meg. Simple is good.
 
Side note: this would be a perfect project for an older sibling to make for a new baby, especially if they're learning how to sew. It's that easy/kid friendly. :)


You'll Need:
about 1 yard fleece (or other cozy fabric)
about 1 yard flannel
regular sewing implements
 
Tip: you can sub the fleece for minky or other super soft knits, just beware that many of them are EXTREMELY stretchy and can give you some problems when sewing them together especially if you're a beginner.


Step One:
 
Cut your flannel.
Mine is is about the size of a typical receiving blanket, measuring at 30"x34".


I also used a circle template to round my corners.
I like the look of the rounded corners,
and *added bonus* if you're not a big sewist or you're using this as a kid-friendly project, it's nice to not have to tackle corners just yet. :)


Step Two:
 
Lay your flannel on your fleece with right sides facing and pin together. 
Tip: I find it easier to pin, sew, then trim the fleece as opposed to cutting your flannel and fleece to the same size and matching up the sides.


Step Three:
 
Sew the pieces together using the pressure foot as a guide
and leaving about 6 inches open to turn right side out.


Step Four:
 
Trim the excess fleece.


Score your rounded corners, being careful not to cut through your seam allowance.
This will help the blanket lay nicer at the corners.


Unpin, turn right side out, and iron flat, spending extra time at the seams so they lay as flat as possible.


Step Five:
 
Top stitch around the edge of the blanket.
At the 6 inch opening, make sure that you catch both fabrics to sew them together.


Step Six:
 
"Quilt" the blanket together.
I just sewed straight lines across the blanket from one side (at the top stitch seam) to the other,
and then again across in the other direction (perpendicular).


Done! See? I told you it was simple.


I like to wrap it up like a little bundle for the "little bundle."
See what I did there?
:)


What are your favorite baby shower gifts?


Tuesday, January 22, 2013

Quilting Goal for 2013

Pin It
Like many of you, I've been setting my goals for 2013 over the past few weeks.
It's only January and already the calendar is starting to fill up
which can be completely overwhelming.
 
So I'm determined to set realistic goals for the year.
One of those goals was to make one quilt.
If I got to more, great, but the goal is just the one.
 
And for that one quilt, I was going to finally get around to making a queen size for our master bed,
a project which I have been intending to do since Chris and I got married (almost 4 years ago).


That was my intention.
You see, one of my favorite local ministries expressed a need.
And it was a need I felt like I could should meet,
and one that, frankly, I'm thrilled to meet.
 
After years of borrowing space from local churches,
they are finally in the process of building a brand new facility.
And it's huge and amazing and will allow them to grow and achieve even more than they already do.
 
The East End Cooperative Ministry is one that I've written about before.
Among other things
they feed the hungry,
they clothe the naked,
they mentor children,
and as I sit in my warm house right now, I am especially grateful that they shelter (including serving dinner and breakfast to) the homeless.
Pittsburgh is beautiful in the winter, is it not? :)
 
With this new facility they will be able to expand that shelter to house more men,
more women and children,
and more of the sick and elderly who have been discharged from the hospital and need respite care but cannot receive it in their prior housing.
 
And I really could go on and on... but you can check it for yourself.
 
So here's the fun part:
The shelter's designer had the idea to have a handmade quilt for each of the shelter beds.


My first reaction when I heard this was one of shock (that's a lot of beds! they house over 650!!!).
My second reaction (the one that should have been my first reaction) was one of conviction.
For those of you who may not have made a quilt before,
it is a labor of love.
It takes time and patience.
It take vision and skill.
And often it takes some money. Supplies aren't cheap!
 
And who is more deserving of a handmade, loved over, and hopefully prayed over quilt, than those without a home, those with whom most people avoid eye contact, those who all too often are the forgotten ones?
 
So I'm once again putting my master bedroom quilt on hold,
and I'm diving in to cut, piece, stitch, iron, baste, quilt, and bind what will hopefully be a beautiful blanket but more inportantly be a labor of love from me to them, even though they will most likely not even realize it.
 
So why am I telling you this?
It's certainly not to toot my own horn, although I will be sharing pictures of my progress as I go for funsies.
It's to get the word out about this awesome place.
If you feel inclined to donate money, prayer, or even a quilt, I encourage you wholeheartedly.
And if you don't live in the Pittsburgh area, I encourage you to check out shelters in your area and ask what their needs are. There all always needs.

If you are in the area, I'm going to be collecting non perishable food items over the next few weeks to stock their food pantry.
If you would like to donate some food, please let me know!
I'm even willing to pick it up.

As for the quilt, my mom (who is the greatest as I've mentioned before) has gratiously donated the batting and the muslin.
And I'm hoping that this quilt will be a total scrap buster.
If I need more fabric, I'm shopping from my own stock with the hope that I don't have to buy anything new.
 
Do any of you have shelters/ministries in your area that you love?
I would love to hear about it. :)

Friday, February 17, 2012

Quilted Valentines Banner Tutorial

Pin It
I know I should have posted this about a month ago so that some of you could make this before Valentines Day. I didn't do that for one simple reason. It wasn't complete. In fact, I hadn't even started a month ago.
But a couple of you have asked about the block patterns for the letters that I used to spell L-O-V-E.
So I thought I would post a tutorial for the banner that I posted on V Day in the event that any of you would like to make it for next year, you are pink heart enthusiasts and want to keep it up all the time, or would like a simple "how to" for making quilted letters.

So here it goes...


What you'll need:
quilting fabrics in an assortment of colors
(I don't normally have pinks in my arsenal of fabric, so I just bought some fat quarters)
batting (3'x3' would be more than enough)
muslin for borders and back (you could also use a contrasting quilting fabric)
usual sewing implements
a dowel and ribbon if you would like to make it banner like mine and not a mini quilt
(I picked up my dowel from Michaels for about a buck, and the ribbon I had. Use whatever you would like)

Planning and a Word on the Letters:

Before you begin, you'll want to plan out your blocks. Because I wanted my blocks to spell out a word, I chose a basic block pattern (log cabin) as my template and then tinkered with it to form the letters (the block patterns are below).
I chose the log cabin block as my base because it's all right angles which is easier to sew (yay!), and it had enough pieces that I could shape letters into it fairly easily.
To shape those letters, I shaded in select boxes.
When I began cutting and sewing, I used contrasting fabrics for those shaded parts to highlight the letter within the block.

I enjoyed this so much and it turned out so well (and quickly) that I've thought about making a similar one as a mini quilt for a doll and using letters that spell a name... we'll see if it happens... have to have a daughter (no small task, and no mom! not pregnant! ;) ) or make one for a neice.

For the "O" I used a heart (since it's for V Day and all).
This block was, by far, the most difficult, but it is all straight lines, and really the most time-consuming and brain-bending part is cutting the right pieces.

Once I had my letters planned out, I started creating...

Step One: Cut your fabric.

For the heart, you can follow the cutting list provided with the block pattern.
For the other letters, you just want to cut a lot of strips 1.5" in all the fabrics you're going to use.
No need to cut each piece as you can just trim the excess off as you sew (more on that later).
You'll be sewing these strips with 1/4" seam allowance to make, in the end, a 10" square.
Keep in mind that it's better to make your square bigger than smaller than 10" because you can always cheat (like I do) and trim it down to 10" after sewing. That way your blocks all meet up nicely.

Step Two: Sew

Sew your blocks using the patterns included on this post, or some that you've made.
Clearly, if you're making your own patterns, you have no need for this tutorial, but anyway...

Tips:
When sewing a log cabin block, you want to start from the middle of the block and work your way out.
If you would like an easy tutorial for the method behind sewing a log cabin block, watch this video.
Sew your two center pieces together, trim excess, iron flat, rotate your block to attach the next piece, and repeat.

Trimming as you go will help keep your edges straight which will keep your blocks straighter in the end.


Use a highlighter to mark off the pieces that you've done. It will help you keep track.
Keep your diagram/pattern handy so you can double check your work, and be mindful of which fabric you're using so you can see your letter clearly once your finished.
Don't be afraid to whip out your seam ripper, and start a piece again. It happens. ;)

 
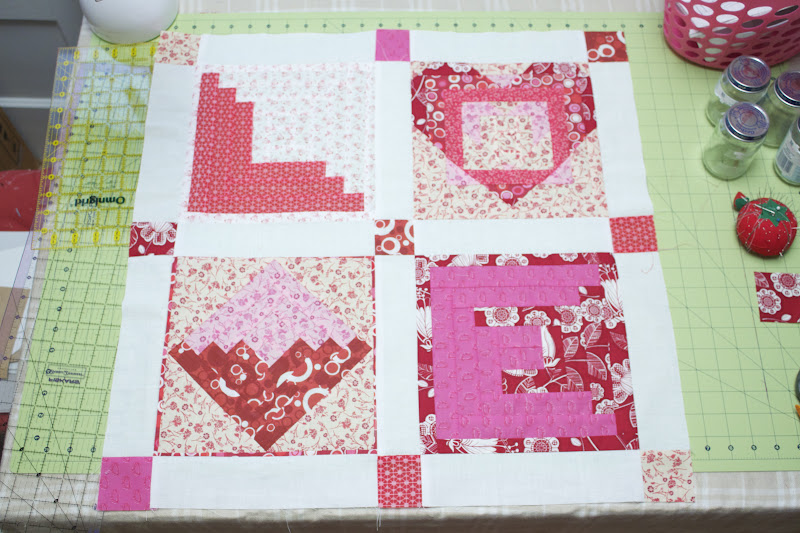
Step Three: Piecing your Blocks Together
Once you have all four blocks sewn, place them together however you would like them to appear.
Cut muslin or contrasting fabric for your border.
I cut 12 3" x 10" pieces of muslin and 9 3" x 3" squares of my left over pieces of red and pink fabrics.


First, sew muslin pieces to the top and bottom of square 1 (top left). Then, sew a muslin piece to the bottom of the square below it. Next, sew bottom square to the top.


Repeat for the blocks on the right side.
It should look like this.


Next, sew your vertical strips.
That is, a fabric square, a piece of your muslin, another fabric square, a piece of muslin, and another fabric square.
Repeat twice more.

Finally, sew your vertical strips to your square strips, trying your best to meet your corners.

You're top quilt is finished!

Step Four: Put your Quilt Together

Lay a piece of muslin (at least 3' x 3') on your work surface.
You can also use a piece of contrasting fabric. If it has a right side, then make sure it is right said down for this step.
Then place your batting on top.
And your quilted top (right side up) on top of that.
Pin it all together really well.
Step Five: Quilt

I machine quilted my banner. You could obviously hand quilt here, but I was in a major time pinch to get this done by the 14th!
I quilted "in the seams" of the top piece,
first sewing in the seams of the edges of each block,
and then I quilted the outline of each letter.
Super quick.

Remove your pins.
It's coming together, yes?
Step Six: Binding
I cut a long long long 2" strip of muslin. I think it would also be super cute to use another red fabric for the binding, but since I just had fat quarter, that wasn't possible.
Take one end of your binding fabric and fold it over. Iron that down. This will hide your raw edge when you sew it on your quilt.


Then pin your strip all the way around your quilt.
Make sure that your sewing it with right side facing if your binding fabric has a right side.
Start sewing all the way around,and  just keep sewing about an inch or so so the edges overlap.
Trim off any excess at the end.


You might want to iron your binding out, so it lays kind of flat.

Then flip your work over.


Fold your binding piece under about 1/2". You can iron it if it will help. I didn't.


You're now going to take out your old-fashioned needle and thread and sew your bind down on the back so the folded edge meats the back of your quilt.
Work all the way around.

If you're just making a mini quilt, stop here. You done!

If you want to make it a banner, continue...

Step Seven: Making Your Quilt into a Banner


Cut three lengths of ribbon.
They should be the same size.
Keep in mind that the length of the ribbon folded in half, will determine how low your banner hangs from the dowel.
Sew your ribon pieces on the back of your quilt.


Now for the dowel...
I drilled holes in each end and then fed my ribbons through. Then tie your ends together.
This is much like what I did for my Jesse Tree Advent Calendar.
If you want a more finished look, you can paint your dowel.
I'll probably end of painting mine white... at some point. :)
Done and done.

Have a great weekend, everyone!

Block Patterns:

L

V
You could also use this for the O if you choose not to use the heart.
E
The Southern Institute

Tuesday, February 14, 2012

Happy Valentines Day

Pin It
So, I don't know what I was thinking...
(I say that alot don't I? Oh well.)

but I was looking through some blogs about a week ago.
We're talking legit blogs with tons of followers and great ideas,
and I found some great Valentines related crafts swirling around in the blogosphere


which then inspired me and led to about a BILLION ideas in my head.
Only one of which actually came to fruition.

And I finished just in time.
Late for the blog world.
And super early for next year.

Whatevs.
I finished.


and I thought I would share since I like the way that it came out,
and I haven't posted anything in the way of quilting.


I love the idea of quilted things, but don't quilt a lot myself because, let's be honest,
I'm more for instant gratification when crafting.
Quilting takes a lot of time.


But this was a great quilting project for this time in my life
because it's only four blocks.
They came together pretty easily and quickly.
And I just machine quilted it which, of course, is much quicker than hand quilting
(although, I'm sure it would look a lot better if I had taken that time to hand quilt it.)


I wanted to put up some pictures today, being that it's Valentines and all.
I'll post the tutorial and block patterns in the next couple of days.

Hope you all experience the love of Christ today and everyday.


"For God so loved the world that He gave His only begotten Son, that whoever believes in Him might not perish, but have everlasting life. For God did not send His Son into the world to condemn it, but to save the world through Him." John 3:16-17