Showing posts with label invitations. Show all posts

Monday, January 27, 2014

DIY Wedding Invites and Programs

Pin It


I've mentioned that my cousin/one of my favorite people in the universe got married in October.

And I already shared with you the awesome Bridal Luncheon Invitations that my mother made for her.


She then asked me to help with the design of her wedding invitations and programs,
and since I was due with Michael the day before her wedding and therefore couldn't be there in person,
I wanted to be involved in any way that I could.
(Michael, as it turned out, was born during her rehearsal dinner, so I'm glad I stayed in Pittsburgh)
:)


I love the way the monograming turned out. We used a font called "rage" which is actually many different designs for the different letters. It just so happened that "A" and "E" are the same design.
It's like Amy and Erik were meant to be or something. :)

So we ended up using this same monogram for some place cards and thank you cards as well.


She chose beautiful colors and papers for the invitations,
so I wanted to something really classy and along the same lines for the programs.
We found some really antique grey card stock for the outside, some textured ivory paper for the inserts, and of course bakers twine. I'm such a sucker for baker's twine.


My mom designed the document for the programs in Photoshop, and then we got to work on printing, cutting down, and assembling them all…
About 20 trips to Michael's and many hours later,
my mom and I finished these guys up.

Luckily, we love this type of thing,
and it kept our minds and hands occupied while we were waiting for Michael's arrival.

I suppose we could have finished a lot earlier if we weren't so neurotic about square vs. rounded corners and font selection and sizes… but then what would be the fun in that?

Thanks, Amy, for letting me be a part of your day even though I couldn't be there in person!
Love you lots.

Monday, September 9, 2013

Bridal Luncheon Invite + Thank You Card

Pin It
photo 2


and now for the newest installation of “Meg is busy doing random things, so here’s something her mom made”


yes yes. More cards from my mom. She is so talented with the paper-crafting, I can’t help myself, ya know?


photo 1


First off, this super cute thank you card.


My mom has a knack for making thank you cards for people that are exactly his/her taste. Now, that, is the gift-giving love language, am I right???


noodleheaddividedbasket


This was a thank you card for me since I gave her a divided fabric basket for Mother’s Day (made from this awesome pattern by noodlehead) to hold her paper-crafting materials.


Did you get that? I made her something to hold the things that she makes, so she made me this card to thank me for the thing that I made. I love my family.


photo 3


And next up, this super intense bridal luncheon invite which she made to semi-match the bride’s invitations and wedding colors.


The front. So classy.

The band with the text slides off so you can open the invitation.


photo 4


The back (with the bride’s monogram).


photo 5


The inside

with pull cards for the details and RSVP information.


Super cute, right?


Great job once again, mom!

And I CANNON WAIT to share more of the wedding details from Amy’s wedding! We’ve helped her design the invites and lots of other pretty details like the place cards and programs! so stay tuned! :)

Wednesday, March 6, 2013

Car Birthday Party {DIY Details}

Pin It


For those of you that follow me on Facebook or Instagram,
you've been seeing all my car posts over the past few weeks.
 
 
My little buddy turned two!
And to celebrate, we threw him a car birthday party.
He LOVES cars.
And this is an understatement.


As I mentioned when I shared the invitations with you,
we decided to go for a playful vintage car theme in lieu of the Disney Pixar Cars theme,
and I'm glad that we did, because I loved the way that everything turned out.
 
 
So here are some of the DIY details!
 
 
Since Ben's birthday is in February and we live in Pittsburgh,
all of our set up had to be inside.
We live in less than a mansion,
so we kept it simple, like our Winnie the Pooh Party last year,
and just had some family and close friends over for food and libations.
 
As for decorations, I mostly stuck with the old tissue paper standbys.
As luck would have it, Target had a bunch of their tissue on clearance when I went shopping,
so I got a lot and maybe went a little overboard.
 
 
I made a ton of these pom poms in all different sizes and colors and hung them from the ceiling with fishing line.
They added a fun burst of color when you came in.
 
 
I also made two long fringe tissue banners,
one for over the food table and one for our living room where most of the seating is.
Tissue paper decor is great because you can buy it super cheap is basically any color.
If you're not picky about colors, the dollar store is a great resource.


My centerpiece for the food table was this "road sign" in the shape of a B (ya know.... for Benjamin).


The letter I bought for a couple bucks awhile ago for his bedroom.
It's just the paper mache kind from Joanns.
I painted it black and then added the dashes.
Simple. Simple.


The food table turned out really nicely with some fabrics that I had from other projects.
The route 66 fabric is one of my favorites. I just put it over a box to elevate the cake stand a bit.
 
The "fuzzy dice" are white square boxes that I had which my mom and I added black dots to.


For my food labels, I made a simple placard in Photoshop to look like a license plate.
 
I tried to make them look as much like a PA plate as I could, and added Ben's name at the top.


Not all of the food was themed,
but we did make "nuts and bolts" (chex mix), pot holes (peanut butter cup cookies), and dip sticks (pretzels) for the snack food.


We also made pigs in a blanket (because who doesn't like those?),
and my mom made this awesome stop light for the dips (ketchup, mustard, and relish).


She did a great job just using poster board!
So cute.


For our drink table, I also kept it simple. I used more steel accessories that I had around the house and some bandannas from a camping trip.
 
 
The only thing really themed was the gas pump placard I made in photoshop.


The car cake was so much fun for me to make.
The bottom is two round cake layers,
and I carved the car out of a loaf pan.


Since I knew I would be carving the car, I wanted a pretty dense cake
so I opted for Elvis' Pound Cake.


I have to say, it was yummy, but definitely dense.
I could only eat a very small piece.


The tires are chocolate donuts.
The headlights are yellow m&ms.


The grass is coconut which I threw in a ziploc and tossed with a few drops of green food coloring.
Shake shake shake, and you have grass!


And I made a road sign to go beside the car which I just posted on a chopstick.


I also made Ben a special shirt to wear.
He was so busy at his party, that this, unfortunately, is the best picture I got of it. :)


I bought a plain shirt at Target, and free handed the car with a bleach pen.
I don't know if it was because the shirt was a little thin, or that it was lighter in color,
but I literally left the bleach solution on the shirt for about 1 minute and then rinsed it off.
Any more, and I was afraid it would all just bleach to one big blob.


And my last detail is our favors. I got these little steel buckets for a buck and filled them with some candy, toy cars, and playdoh for good measure.


And that's that!


Ben had such a great time playing with his friends and family,
and he especially liked the cake. :)
 
 
Happy Birthday, buddy!
We love you!!!


Tuesday, February 26, 2013

DIY Bridal Shower Invitations

Pin It
My best bud and her mother are hosting a bridal shower in the coming month
and I had the pleasure of helping them out with the invitations.
 
This was so much fun for me.
We looked at a ton of invites on Pinterest and saw a couple we liked,
so I combined our inspirations with the bride's personality and color scheme (purple and blue)
to arrive at this.
 
 
I personally love them,
and if time travel were possible and I somehow ended up back to planning my own wedding,
I'm sure I would want something similar for myself.
Hopefully, the bride feels the same way.
 

The invitations are 5x7's with rounded corners,
printed on white card stock.
I had a lot of fun playing with a ton of new fonts.
(Many of them can be found on the Resources board of my Pinterest page)
 
 
I also included 4x6 recipe cards on kraft paper
with the bride's name
so all the guests can share their wealth of food knowledge.
I love this idea since I got SO many great recipes at my own shower, many of which I still use.
 
 
Lastly, a little poem about her "wishing well".
This is a custom that was unfamiliar to me until a few years ago.
I'm sure many of you, however, have heard of it.
Basically, the wishing well is for little house gifts for the bride and groom aside from the registry gifts.
I love this idea as well since setting up a new home with cleaning supplies, pantry items (especially spices!), and other necessities is so darn expensive,
and typically you don't register for many of them.
 
The poem reads,
"Spices, detergents, and gadgets galore,
There are never enough,
you can always use more.
Please bring  little item for our bride,
would you please.
Spatulas, freezer bags,
or maybe Febreeze.
Wrap it in tissue,
and your name do not tell.
It's just a little something for her
Wishing Well."
 
 
A little twine and stamping on the envelopes, and it was all set!
 
Hope she loves them.

Monday, February 18, 2013

Car Birthday Invitations

Pin It
It's that time of year again!
I can't believe it, but my little buddy is turning two!
yikes!


We had such a great time at last year's Winnie the Pooh party,
and we're looking forward to more good times at this year's Car party.

It took me about 1 millisecond to figure out what the theme should be for this year.
We pretty  much eat, sleep, and breathe cars around here.
:)

While Ben loves the Disney Pixar movie 'Cars',
and I've seen some awesome 'Cars' parties out there,
we opted for cars in general.
Updated vintage?
Is that a thing?
We're making it a thing...


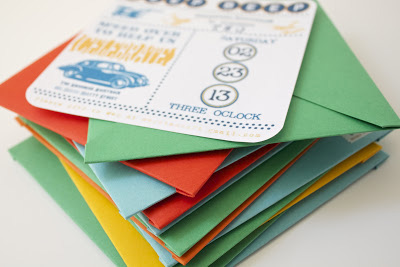
So here are the invites.


I have a new love of my rounded corner tool.
And for square invites.


However, I couldn't find square envelopes that I liked,
so I made these with some fun-colored paper I had.
Who doesn't love some washi tape?


So, obviously, I'll let you know how it all turns out!


I'm purty psyched!


Wednesday, October 24, 2012

Monster Birthday Invites

Pin It
I got this in the mail yesterday.

I just had to share.


My gifted mother has struck once again.
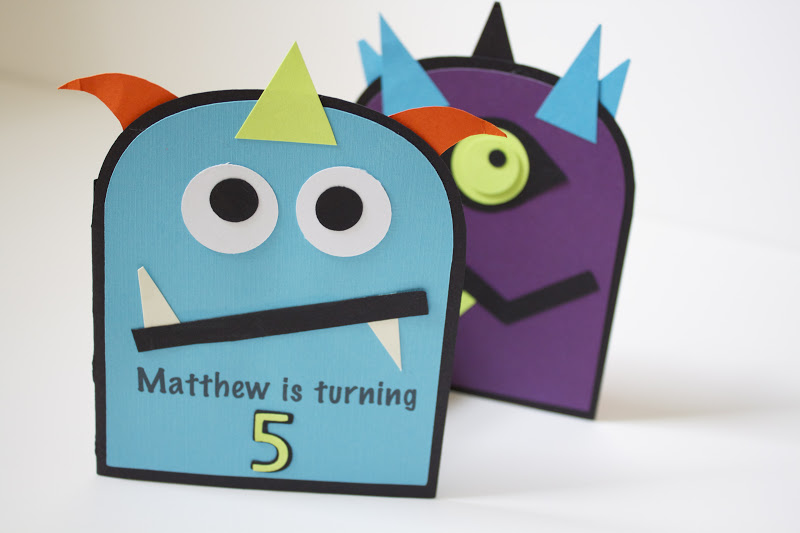
She made these adorable tri-fold invitations for my even more adorable nephew, Matthew's, monster birthday party.

He's a Halloween baby,
so I guess it's some kind of poetic justice that he wanted his birthday to be monster-themed.


So cute right?

I love my family.
Happy early birthday, Matthew!

Friday, March 9, 2012

Our Winnie the Pooh Party

Pin It
Welcome to the Hundred Acre Wood!

As promised, here are some of the details from Ben's first birthday party.
We were blessed to have family and a few friends over to celebrate the day.
My mom and step father were in town which is always exciting and a big deal since they come to us from California. My aunt came up from Atlanta. Many of Chris' relatives came from around the area.
It was great.

I've already shared a picture of Ben's special birthday outfit in my giveaway post, but I'll share more, because who can get enough of this???
My best friend and his godmother, Sarah bought the jeans and suspenders from H&M.
I had no idea that they even sold baby clothes, but I'm glad now that they do.
I got a button down shirt to match and made a little neck tie from the skinny end of a regular tie.

My handsome men.
Before I go any further, I guess I should state:
this being Ben's first party (and him being only one and all),
it was really a party for grown ups.
Most of the food and drink were things that he doesn't eat/drink yet,
but he didn't seem to mind at all.
To be honest, he's such a ham, I'm convinced that he thinks everyday is a party starring him.

So this was more of a party for adults that was about a baby. :)
We didn't do games or favors or anything like that, and he obviously needed some assistance with the unwrapping of gifts and blowing out of candles.

The invitations I just put together on my computer and printed them off on some pre-cut paper from a wedding invitation kit that I found on clearance.
For more pictures and details on those, go here.

For the decor, much of it I already had on hand, but even if I didn't, it's all inexpensive.
The clouds are made of poster board and fishing line... about $2 all in all.
The banner is colored paper (on clearance) from Joann's and jute rope (like you would use for a clothesline). The letters are printed on regular paper from a Word document and then pasted to the pennants. The total for this came to about $3. No harm, no foul.

For the tablescape, I used burlap as a tablecloth.
I found pine cones at the craft store after Christmas on clearance for 50 cents. They were, however, the cinnamon-scented ones, so I actually left them down in my basement for a long time to let the odor eek out a little. That stuff gives me a headache.
I used the same colored paper from the banner and jute rope to make the food labels and then just used the pine cones as my card holders.

For the food and drink, I tried to make as much of it "Winnie the Pooh" related as possible.
Our menu items consisted of:
-Piglets in a Blanket (maybe morbid, but oh so tasty)
-Tigger Tails (also morbid?)
- Owl Cupcakes
-Rabbit's Garden
-Hundred Acre Wood Acorns
-'Hunny' Cake
-'Hunny' Roasted Nuts
- 'Hunny' Apple Brie Bites
-Hoagies... haha. Not themed. Oh well. :)

The 'Hunny' Cake was definitely the star.
We used a beehive pan from Williams Sonoma. My aunt has made this cake so many times, she should be considered a professional. She stuck white store bought frosting in the microwave for a bit and it was the perfect consistency to pour over the top. She also brought the sugar bees for decoration which she ordered online.

The Tigger Tails were easy as well. Although the chocolate did seize up on us a bit, we worked it out and they turned out pretty nicely.
They're just pretzel rods dipped in white chocolate which we dyed orange with food coloring. Once those set a bit, we drizzled melted semi-sweet chocolate over the top.
Fun to make. More fun to eat.

My "Hundred Acre Wood Acorns" were Hershey's Kisses, Nutter Butter Bites, and mini chocolate chips, all "glued" together with melted chocolate.
And "Rabbit's Garden" was your token veggie tray with hummus and dip.

The owl cakes may be my personal favorite. I morphed two owl cupcake ideas that I found online to make these. Doesn't a cashew make the perfect beak?
The eyebrows are chocolate-flavored licorice.
The eyes are obviously Oreos with a chocolate chip for the pupil.
Warning: I tried to cut a cost corner and buy the off brand cookie, but the creme center was too soft, and I could not get them apart while leaving a nice white circle. I know, talk about a 'first world problem.'
So if you're ever making something with Oreo halves... get the real thing. Then, stick them in fridge for about 10 minutes. No more. No less. And don't use the freezer.
Can you tell this took some trial and error? :)
Luckily it was worth it. So cute.


For drinks, I just served tea in my bee hive drink dispenser (found on Amazon),
cups were mason jars which I always have for canning
and yellow paper straws that I bought for a steal off Etsy.

The water bottle labels I also made on my computer using regular paper and then just taped them on.


So that's it!
We really had such a great time with our friends and family,
and we're already looking forward to next year. :)

Thanks, friends!

and remember...


 "A day without a friend is like a pot without even a drop of honey inside." -Winnie