Showing posts with label holidays. Show all posts

Monday, May 6, 2013

Handmade Spring Cards

Pin It
I love having a creative mom.
Not only is she is the one who taught me most of my skills,
she also sends me great stuff all the time including her fabulous handmade cards and photo albums.

March and April are big months for our family.
My Birthday.
Our wedding anniversary.
Chris' birthday.
also a little holiday known as Easter.


So I thought I would share some of the gems my mom sent for said occasions.

Surprise Birthday Card


This one my mom made in mass for a friend's surprise party.
The couple really like suns, apparently, so she came up with this.
So cute.

Monogrammed Birthday Card


This one was for my birthday, and the photo doesn't really do it justice.
That doily looking medallion is about 3 layers thick with an intricately cut pattern.
My mom's style usually involves a lot of layering.

Tagged Birthday Card


This one is for Chris, and once again, the photo just doesn't give you an adequate visual of the details.
My favorite detail is the bicycle tag which is actually an envelope to house his gift.
Once again, there are about twenty million layers involved.
Love it because it's cute but still masculine enough.

Kid's Easter Card


This was obviously for Ben.

And I mean, come on... so cute.
Little fuzzy bunny tail and hand cut grass. Need I say more?

To see more of my mom's creations, click here

and here.

Thanks, mom!

Wednesday, February 13, 2013

Valentine's Cards

Pin It
I've mentioned many times before that my mom is the best.

She is especially gifted when it comes to paper crafting.
One of the top benefits of her friendship (and daughterhip?) is receiving her handmade cards on holidays.

So I just wanted to stop in today to share her Valentine's cards that we received yesterday.


One for Ben with super cute heart balloons.


I especially love the bicycle image.


And one for Chris and me


with a cool pop out heart banner.


Thanks, Mom!


And

Happy Valentine's Day

to the rest of you crazy kids.

Thursday, February 7, 2013

Ben's Valentine's Gift

Pin It


In the interest of "being real"

I must disclose that I'm not much of a Valentine's person.


Maybe it's all the pink (ick)
or the feeling of forced lovey-doveyness
or the fact that it falls in my least fave time of year...
probably "D", all of the above.

So really it's a minor miracle that this happened at all.
In my 1.5 year(s) of blogging, I don't have the best track record when it comes to V-day crafting
(see above statements).

Last year, I did complete my LOVE mini-quilt/banner,
but by the time I posted it, it was approximately 9 pm on the 14th.
you're welcome blogosphere.

No matter!
I did put together two of these quasi-valentine's gifts for Ben and his lady-friend, Lucy.
I originally intended them to be Christmas gifts,
and guess what?
Didn't order the books on time.
Shocking, I know.

All is well, t hough, because V day is about love
and there are few things that I love more than books.
and felt.
and kraft paper with twine.

The book is one of my favorites from childhood,
that I've been wanted to purchase for Ben since I got pregnant.

It's The Jolly Postman by Janet and Allen Ahlberg.


The gist: a postman delivers mail to different fairytale characters
The best part: yes, there's actual mail that you can open and read.

Take a look! It's in a book! Reading Rainbow!!!


To go with the books,
I got these cute little mailboxes from the dollar bins at Target.


Then made felt envelopes to put inside (tutorial below).
and some heart, of course.


Felt Mail Tutorial


Step One:


Cut felt as pictured here.
Easy enough, yes?


Step Two:

Sew on a rectangular "stamp" in contrasting color.
I zigzag stitched around to keep it in place.

On some of them, I also sewed a zigzag for the "writing".


Step Three:

Fold the envelope so the sides match up and sew along each side (as pictured)
I did some with a straight stitch and some with a zigzag stitch.


Step Four:

I sewed a crease into the top of some of the envelopes so the flap would stay down, and the others I just tucked the flap in.


And done!


So cute.

Wrap it up
and gift away!


Happy V Day, all!


Thursday, December 20, 2012

DIY Super Hero Towels

Pin It


Because who wouldn't want those?

I know what you're thinking,
"Meg!!! Stop with the towels and bath accessories already!"

But in all fairness, my nephews have a super hero obsession. and a super hero bathroom, for that matter...
sooo....
they obviously needed these.
Not to mention, this again fell into the realm of "quick and easy" DIY Christmas gifts
and are making feel a bit less guilty about not making things this year for the bulk of my family.


Once again, I'm going to get real with you here and say that I would post a tutorial,
but it would be an insult to tutorials. They're that simple.


Strip of fabric (these are about 8" wide to include the most heroes possible).
Iron under.
Sew.
Serge edges.


For those of you that sew, you know that licensed fabrics can get really expensive and don't go on sale too often,
so when I found this on sale and could use a coupon on top of it, I snatched it up.
I got a lot of bang for my buck, too, since it's just one strip on each towel.
Super bonus: I got the towels on Black Friday for 1.50 each.
Total cost was under $10 for two towels.
Not bad.


I, of course, got the nephews something else to go with the towels.
Something "for fun", perhaps.
But hopefully these will make bath time a little more fun, too. :)

Wednesday, December 19, 2012

Quick and Easy Grandparents' Gift

Pin It


I'm alive!
It feels like I haven't posted in a year!
I have been really busy here with Christmas orders for my Etsy shop,
trying to stay on top of my household chores (although I'm critically losing that battle),
and maybe just maybe trying to squeeeeeze in some time for my own holiday gifting.
I take this time to apologize to my family:
you will most likely not be getting anything handmade, as I'm too busy making something handmade for someone else's family. : /
Apparently, I can't have my cake and eat it, too.
Anywayz,
I thought I would return to you all with a gift that I did manage to complete for my own family.
 Pros:
It's fast.
It's easy.
Total cost was less than $5.
It'll make your heart feel oh so warm and cozy.


Cons:
none.
don't be a scrooge.


This project was so simple that posting a tutorial would be a mockery to tutorials.
I purchased the wooden Christmas tree (it already had the mounting hardware on the back).
I purchased the stars (and have approximately 10 million left over).
Painted them in green and metallic paints, respectively.

Then, I wrote on the stars and glued them to the tree,
making sure to leave plenty of extra stars for "expansion" (if ya catch ma drift).


Finally I added the tag with a verse of Scripture written on it. I found it particularly appropriate because of the stars on the tree and the fact that my mother in law LOVES the seashore.

Done and done.
Hope she likes it.

Friday, November 16, 2012

Advent Calendar Revisited

Pin It


Hello interwebs.


If you were tuned in last year for my Jesse Tree Advent Calendar posts, then you can probs just disregard this whole post.
If you weren't, or if you're of the beautiful few that have asked me for details,
it's your lucky day... ahem.


I love love love Advent and Christmas. a lot.
And I love Advent calendars, but last year I wanted one that was more biblically "reason for the season" based.
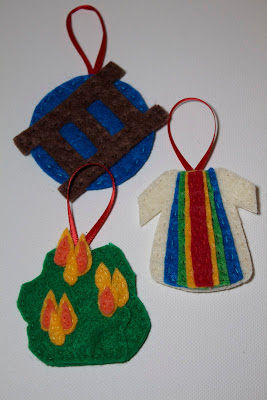
So I made this one.


There are 24 ornaments so it doesn't aactually run the liturgical season of Advent which changes every year. Rather, it begins on the 1st of December and ends on Christmas Eve (like most Advent calendars).


Here are the individual ornaments and scriptural references.


Day One: Creation
Genesis 1:1-31; 2:1-4
 
Day Two: Adam and Eve
Genesis 2:7-9 and 18-24
Day Three: The Fall of Man
Genesis 3:1-7 and 23-24


Day Four: Noah
Genesis 6:5-8, 13-22; 7:17, 23, 24; 8:1, 6-22
 
Day Five: Abraham
Genesis 12:1-3
 
Day Six: Isaac
Genesis 22:1-14


Day Seven: Jacob
Genesis 25:1-34; 28:10-15
 
Day Eight: Joseph
Genesis 37:23-28; 45:3-15
 
Day Nine: Moses
Exodus 3:1-15


Day Ten: Samuel
1 Samuel 3:1-18
 
Day Eleven: Jesse
1 Samuel 16:1-13
 
Day Twelve: David
1 Samuel 17:12-51


Day 13: Solomon
1 Kings 3:5-14, 16-28
 
Day 14: Joseph
Matthew 1:18-25
 
Day 15: Mary
Matthew 1:18-25; Luke 1:26-38
 
Day 16: John the Baptist
Mark 1:1-8


Day 17: Jesus is Wisdom
Sirach 24:2; Wisdom 8:1
 
Day 18: Jesus is Lord
Exodus 3:2; 20:1
 
Day 19: Jesus is Flower of Jesse
Isaiah 11:1-3


Day 20: Jesus is Key of David
Isaiah 22:22
 
Day 21: Jesus is Radiant Dawn
Psalm 19:6-7


Day 22: Jesus is King of the Gentiles
Psalm 2:7-8; Ephesians 2:14-20
 
Day 23: Jesus is Emmanuel
Isaiah 7:14; 33:22
 
Day 24: Jesus is Light of the World
John 1:1-14


Each ornament has the name/theme of that day embroidered on the back.
 
And then I attached ribbon loops to the tops of each for hanging.


I embroidered the numbers on squares and then made those into pockets at the bottom of the banner.


I sewed a channel in the top and fed a dowel through.
I also drilled holes in each side of the dowel to string a ribbon through for mounting on the wall.


Want even more details?
For the original posts:
 
Click here for Part Three (Making the banner and the finished product)
 
Are any you making an Advent calendar? Or have you already made one?

I would love to see pics!
I you want to share, email them to me at handmadebymeg@gmail.com
and we'll have an Advent calendar sharefest here on the ole blog.

Tuesday, October 30, 2012

All Saints Day Sale!

Pin It
In celebration of All Saints Day this week,
 
 
I'm offering 15% off all of my Felt Saint Dolls
in my Etsy shop now through Friday, November 2nd!
 
Woot Woot!
(fist pump)
 
Just click on the "Only For Likers" tab on my facebook page to get the coupon code!
 
Please note, that you must put in the coupon code upon check out on Etsy to redeem the discount.


These dolls are made to order,
so now is the time to buy if you're thinking of purchasing one for Christmas!


Don't see the saint you're looking for?
 
Etsy convo or email me for information about purchasing a custom saint doll.
handmadebymegk@gmail.com


And Happy All Saints Day!